


How to set up VPS hosting? (Complete Guide)
- By Admin --
- Nov 08,2021 --
- 2791 Views ,
- 4 Comments
Have you recently shifted from shared hosting to VPS hosting? We believe switching from your existing shared hosting plan to the VPS hosting would have been simple. But configuring your VPS the right way is something you have to do to bring your new hosting in working condition.
In this article, we’ll cover the steps for setting up VPS hosting in detail:
Understand your VPS:
Unlike the shared hosting plan, where you get access to multiple applications to make your life easy, you’ll have to learn things on your own.
Your hosting service will only manage the basic setup. It does not include setting up your VPS to the website or application, issuing commands, installation of new application or software. You’ll have to understand and decide these aspects in detail before you can start working with them.
Another essential thing to note is that while working with VPS, you’ll be interacting with a command-line interface to get things done. You might not be used to working with this interface, but that is all you have got.
Login to your VPS:
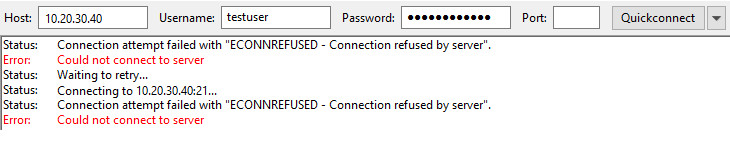
To make any changes or run the VPS, you’ll have to log in. But with no interface available for this purpose, you’ll have to employ the FTP Host or SSH Shell for login. FTP Logins can be simpler, but they won’t allow you to command your VPS; for that, you’ll need to have SSH Shell access.
Upon signing up for the VPS Hosting, the service provider will share the following details. You’ll need them for accessing or logging into your server:
- Your server’s IP address
- A username (usually root)
- A password for your root account
The root user brings in the rights of super admin along with it. By default, you’ll have a single root account, but you can provide access to more administrators as required. But those accounts would not be the root accounts.
Now, the question is where you can add the above credentials to log in to your VPS. As a windows user, you’ll need an SSH Client. Bitwise and PuTTY are the two options here, but you can always search more to find the best SSH Client. For Linux users, the process is simple as they can easily use the command prompt for this purpose.
To get started with these SSH Clients, you’ll need to add your IP address and configure the other required settings. Once done, you can choose the SSH option for opening it. You’ll see a command prompt window to tell you that everything has been managed properly.
Update your server:
The next step you’ll have to employ is updating your server. After you log in to your account, you’ll see the available updates for your server. You can opt to miss out on these updates. But your server and the properties associated with it will be more vulnerable in this case. In addition, you won’t get the latest features.
You can let your server find the software update opportunities by using the apt update command and press Enter. Your server will look for all the possible updates. Once it tells you the status, you can press update to download and install what is missing. It can be a time taking process, depending upon the available updates.
Once it finishes the process, you’ll get a message that the software of your VPS server is up to date.
Create new users and allow them access to your VPS:
If you are working in teams or need help setting up your server, you might need another account. Some users also feel comfortable using a superuser account instead of the admin account. A simple change in the admin account can make a significant impact on the system. It might not be helpful. While in the superuser account, you’ll have to add sudo as a prefix to keep things under control.
adduser yournewusername
Use this command with “username” as the name you want to assign to create a new account.
Now assign this username to the sudo group by using the following command.
# usermod -aG sudo yournewusername
You’ll also need a password to allow login to the server backend. Generating the public Key Authentication could be a secure alternative, which is discussed in the section below.
Generate the Public Key Authentication:
In this method, there are two types of keys, one public and the other private. The public key is stored on the server for authentication purposes, and the private key is on your computer. Apart from these two keys, you’ll also have a passcode. All these keys and passcodes can ensure that only validated users can get into your server settings.
You can generate these keys using the SSH clients like PuTTY.
Enable a firewall:
To make your VPS Server work, the last essential step we’ll recommend you to perform is setting up the firewall.
IPtables application can help you by allowing you to create traffic rules to and from the server. So, you can block or limit any IP Address, making your server secure. However, you might need a complete guide to get it done as it involves a bit of technicality.
Summing up:
By following the steps above, you can easily set up your VPS server on your own. For newbies, this process could be a bit technical. But once you read this guide side-by-side while setting up your VPS server, you’ll be in a better position to understand it. Set up your VPS hosting and get the most out of it.


Comment