


How to Create a TeamSpeak Server (Complete Guide for Beginners)
- By Admin --
- Jun 03,2021 --
- 3349 Views ,
- 18 Comments
Are you looking for an easy-to-use alternative for or regular friends or colleagues’ meetings? Teamspeak is one of the best choices you can make.
But how can you create this server on your own? is this the question hindering you to shift? In this article, we’ll address this issue, so you won’t have to think before shifting to the best.
One thing to note here is that in the entire discussion, we’ll be referring to the creation of the Teamspeak server on Ubuntu 16.04. So, make sure you are on the same page. Besides, you’ll have to access your server via SSH.
Once you are ready to proceed, here are the steps you need to follow:
Create a new system user:
You’ll have to add a new user for the Teamspeak server by using the following command:
adduser --disabled-login Teamspeak
After this command, you’ll be required to enter your details. You can fill them up or leave them blank. It is your choice.
Download Teamspeak Server:
You’ll have to download the Teamspeak server to the VPS. The use of the following command can help you do that directly to your VPS.
wget http://dl.4players.de/ts/releases/3.12.1/teamspeak3-server_linux_amd64-3.12.1.tar.bz2
The next step will be to extract the archive. It will only be possible after the download has been completed.
This is the command to extract the archive:
tar xvf teamspeak3-server_linux_amd64-3.12.1.tar.bz2
After the successful execution of this command, you’ll be able to find everything in the teamspeak3-server_linux_amd64 from where you can transfer the entire data to /home/Teamspeak.
Once done, you can delete the downloaded archive.
To move further, you must accept the Teamspeak license. There are multiple ways of doing so, but using the command below can help you do it within no time.
touch /home/Teamspeak/.ts3server_license_accepted
Typing this command creates a new file, which can work as a license agreement.
You’ll find it by the name: .ts3server_license_accepted.
Configure Teamspeak server to start on boot:
Use this command to ease the process:
sudo nano /lib/systemd/system/teamspeak.service
With this command, you’ll be creating a file Teamspeak. service in /lib/systemd/system. It is one of the necessities to start a Teamspeak server on boot.
But this created file would be empty. You need the following text to be in the file:
[Unit]
Description=TeamSpeak 3 Server
After=network.target
[Service]
WorkingDirectory=/home/Teamspeak/
User=Teamspeak
Group=Teamspeak
Type=forking
ExecStart=/home/Teamspeak/ts3server_startscript.sh start inifile=ts3server.ini
ExecStop=/home/Teamspeak/ts3server_startscript.sh stop
PIDFile=/home/Teamspeak/ts3server.pid
RestartSec=15
Restart=always
[Install]
WantedBy=multi-user.target
Save the file and give the following command for activation and starting it on the server boot:
systemctl enable teamspeak.service
systemctl start teamspeak.service
A status checks at this point is essential to see if everything has been managed properly. Below is the command for the status check:
service Teamspeak status
It should be in the “active (running)” position.
Find the privileged Key:
This is a password that you’ll have to paste to enter the server for the first time.
Executing the following command can give you access to this key:
cat /home/Teamspeak/logs/ts3server_*
Make sure to copy and paste it for later usage.
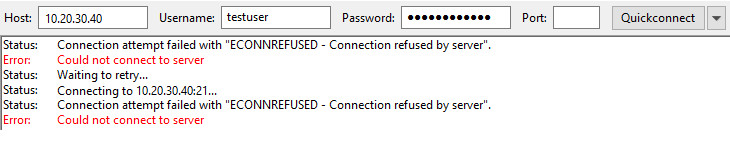
Connect to Teamspeak:
Now connect to this server and apply the key you retrieved in the last step. While connecting to the server, don’t forget to use the VPS IP.
Congratulations, you have created a Teamspeak server on Ubuntu.
For CentOS, the process of creating the Teamspeak server is similar. So, you can apply the above steps, and you’ll be able to get the desired results. For all other operating systems, the creation process concludes in an even lesser number of steps. You can look for specific guides online.
Also Read: How to buy a website


Comment