


How to Transfer Web Hosting from One Company to Another?
- By Admin --
- Jul 28,2021 --
- 2668 Views ,
- 2 Comments
After a careful analysis, have you concluded that your current hosting services cost you a lot more than you have anticipated?
That isn’t a problem with the existence of several hosting service providers in the market. You can always switch to the company that you think provides the best rates not only for the first year of service but for the consequent years as well.
Many of you could be sticking to your old hosting company just because you think shifting to the new hosting would not be easy. If that is the reason restricting you from changing your hosting plan, then this guide can help.
Below we present a step-by-step guide to help you understand each step in detail:
Sign up with a new hosting company:
The first thing you need to do is to sign up with a new hosting company; probably the one that you think provides you the best rate with the best service.
Simply go to the main page of the company’s website. You will have the signup option available. Fill in the necessary details, and you’ll have your account ready.
Choose the right package:
Every hosting provider will offer you multiple packages. You can choose the one that you want for your website and checkout.
You’ll see your new hosting package on your hosting account. Now you are in the position to configure the settings and make the adjustments accordingly.
Save the files of your live website:
The purpose of this step is to create a copy of your complete website so that it can be transferred to the new hosting company with great ease. This copy will include the theme settings, plugins, content, and other modifications you have made to your website.
FTP or File Transfer Protocol service can help you perform this task. One tool to perform this service is FileZilla; it is free and convenient to use.
If you choose FileZilla for this purpose, here’s what you need to do:
Download FileZilla:
You’ll have to download FileZilla Client to copy your website file into your system.
Creation of FTP Account with existing hosting:
To allow FileZilla to access your website, your hosting service provider will need some permission. After which, you’ll get the new login details (in some cases).
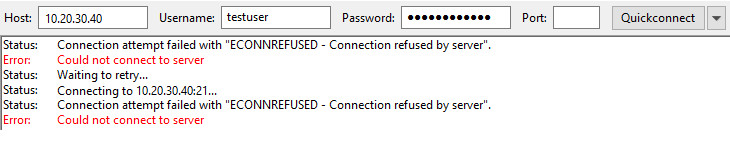
Connect FileZilla to the current hosting:
Most hosting service providers offer the easy connect option. Upon opening FileZilla, you’ll have to enter your domain name. Put in the password, enter 21 in the port field, and press Quickconnect.
Download the files:
Now you can access your website files. Click on the files and download them to your PC. It is better to create a new folder on the desktop for this purpose, as it can save you from the hassle of finding the files later.
Export your database:
Not every website has a database associated with it. The static websites, which don’t have any information to alter, can work without databases, whereas the websites with dynamic content need one. MYSQL Database is the prominent one that most websites use.
Your hosting support team might guide you better on the usage of the database by your website.
Steps to export your database:
1. log in to your c-panel.
2. Open phpMyAdmin
3. You’ll find a list of databases if you have multiple websites. Click on the right database.
4. Click on export and then go.
You’ll have your files downloaded. Make sure to keep all the website-related files in the same folder.
Create a database with the new hosting provider:
You have to export the data you have downloaded in the last step to the new hosting service. To do so, you need to create a blank database initially.
Here’s how:
1. log in to your new c-panel.
2. You’ll find a MySQL Databases section; open it.
3. Find the create database option from the menu and make one.
4. Import your database:
5. When you have the blank database already in place, you can import the previous files.
6. Within the new hosting account, open phpMyAdmin.
7. You’ll see a “+” button under the username. Click it to find all the databases.
8. Select the database you have just created. You’ll find the “no tables found” message.
9. At this point, go to the import tab. Select choose file and find the file you saved from your previous website.
10. Click on Go, and you have your database imported to the new hosting.
Transfer your website files:
Remember, we downloaded the website files before the database download step? We need to transfer those files as well.
However, these files cannot be transferred as such, and you’ll need to change them. These edits will be related to the username and password settings and nothing more.
Settings.php is the main file that will need modification. Find the line with username and password. Make changes here and save the file.
Upload these modified files:
You can use FileZilla for uploading these files as well.
1. Create an FTP account with the new hosting provider too (just like you did with the old one).
2. Sync Filezilla with the hosting provider.
3. Move your files to the public_html folder, and you are done.
Test your website:
This step should be done comprehensively, as any unidentified errors at this stage can spoil your website’s ranking and user experience. 404 errors, internal linking, and menu arrangement are the prominent things you should focus on.
Update DNS settings:
If everything about your website is perfect, you have to update your DNS settings so that your domain DNS points to the new hosting.
Every domain registrar has different settings for updating it. So, you’ll have to look for the specific guides available online for this purpose.
But one thing is for sure, you’ll experience downtime at this stage, and this is unavoidable. However, you can inform your visitors in advance if you want.
Summing Up:
Congratulations! You have successfully transferred your hosting from the old service provider to a new one. So, now you can enjoy the affordable rates or the efficient service from the new hosting provider.


Comment