

How to manage IP addresses on VPS?
- By Admin --
- Nov 08,2021 --
- 2862 Views ,
- 1 Comments
If you are using VPS hosting for your website, you’ll have to get to this topic sooner or later. There is a high probability that you’ll have to manage the IP Addresses at later stages of your website's functioning. So, to help you with the process here is the complete procedure for managing your IP addresses on VPS.
Where can you get your IP address?
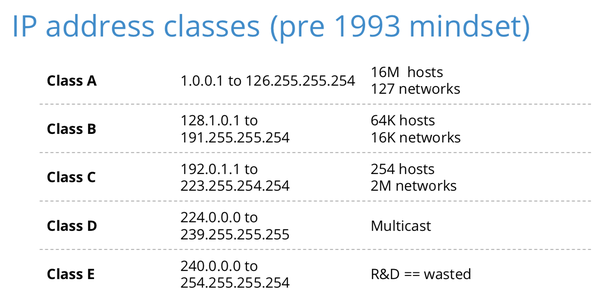
As you know, an IP address is a unique id that each of the properties on the internet has, so you’ll also get one for your website at the time of signing up. The hosting providing companies usually mail them to you.
You can find your website’s IP address, either through the details sent to you by your hosting provider or by logging into your account with the hosting provider.
In most cases, you assign a domain name to your website to replace the number-based IP address. However, in technical terms, it will always be a number. Even if you don’t use a specific name, your IP address will be enough to get to your website.
Step by step process for managing IP addresses on VPS servers:
Below is the complete procedure you can follow:
Step 1: Login to your VPS hosting account with your hosting provider
Step 2: Find the DNS editor from the menu. Different hosting providers have different layouts, so getting to this setting might be different in every case. The easy way is to use CTRL + F command.
DNS offers a linkage between the domain name and your hosting provider. Every time you need to change the servers, you need to point your domain to a new IP address.
Step 3: In the DNS editor, click on “add a new record”. A new dialogue box will appear. Choose the domain name and enter the new IP address in the “value” section. And you are done.
Summing up:
The process of managing the IP addresses on VPS hosting is simple. But it can create a devastating impact on your website if done wrong. So, be careful how you handle the IP Address.


Comment